创建跨平台移动应用程序
代码示例: tutorial-client-kmp
Ktor HTTP 客户端可用于多平台项目。在本教程中,我们将创建一个简单的 Kotlin Multiplatform Mobile 应用程序,它将发送请求并接收纯 HTML 文本形式的响应体。
前提条件
首先,你需要通过在合适的操作系统上安装必要的工具来设置跨平台移动开发环境。关于如何执行此操作,请参阅 设置环境 部分。
你需要一台装有 macOS 的 Mac 电脑来完成本教程中的某些步骤,其中包括编写 iOS 特有的代码和运行 iOS 应用程序。
创建新项目
要创建新项目,你可以在 IntelliJ IDEA 中使用 Kotlin Multiplatform 项目向导。它将创建一个基本的多平台项目,你可以使用客户端和服务对其进行扩展。
- 启动 IntelliJ IDEA。
- 在 IntelliJ IDEA 中,选择 File | New | Project。
- 在左侧面板中,选择 Kotlin Multiplatform。
- 在 New Project 窗口中指定以下字段:
- Name: KmpKtor
- Group: com.example.ktor
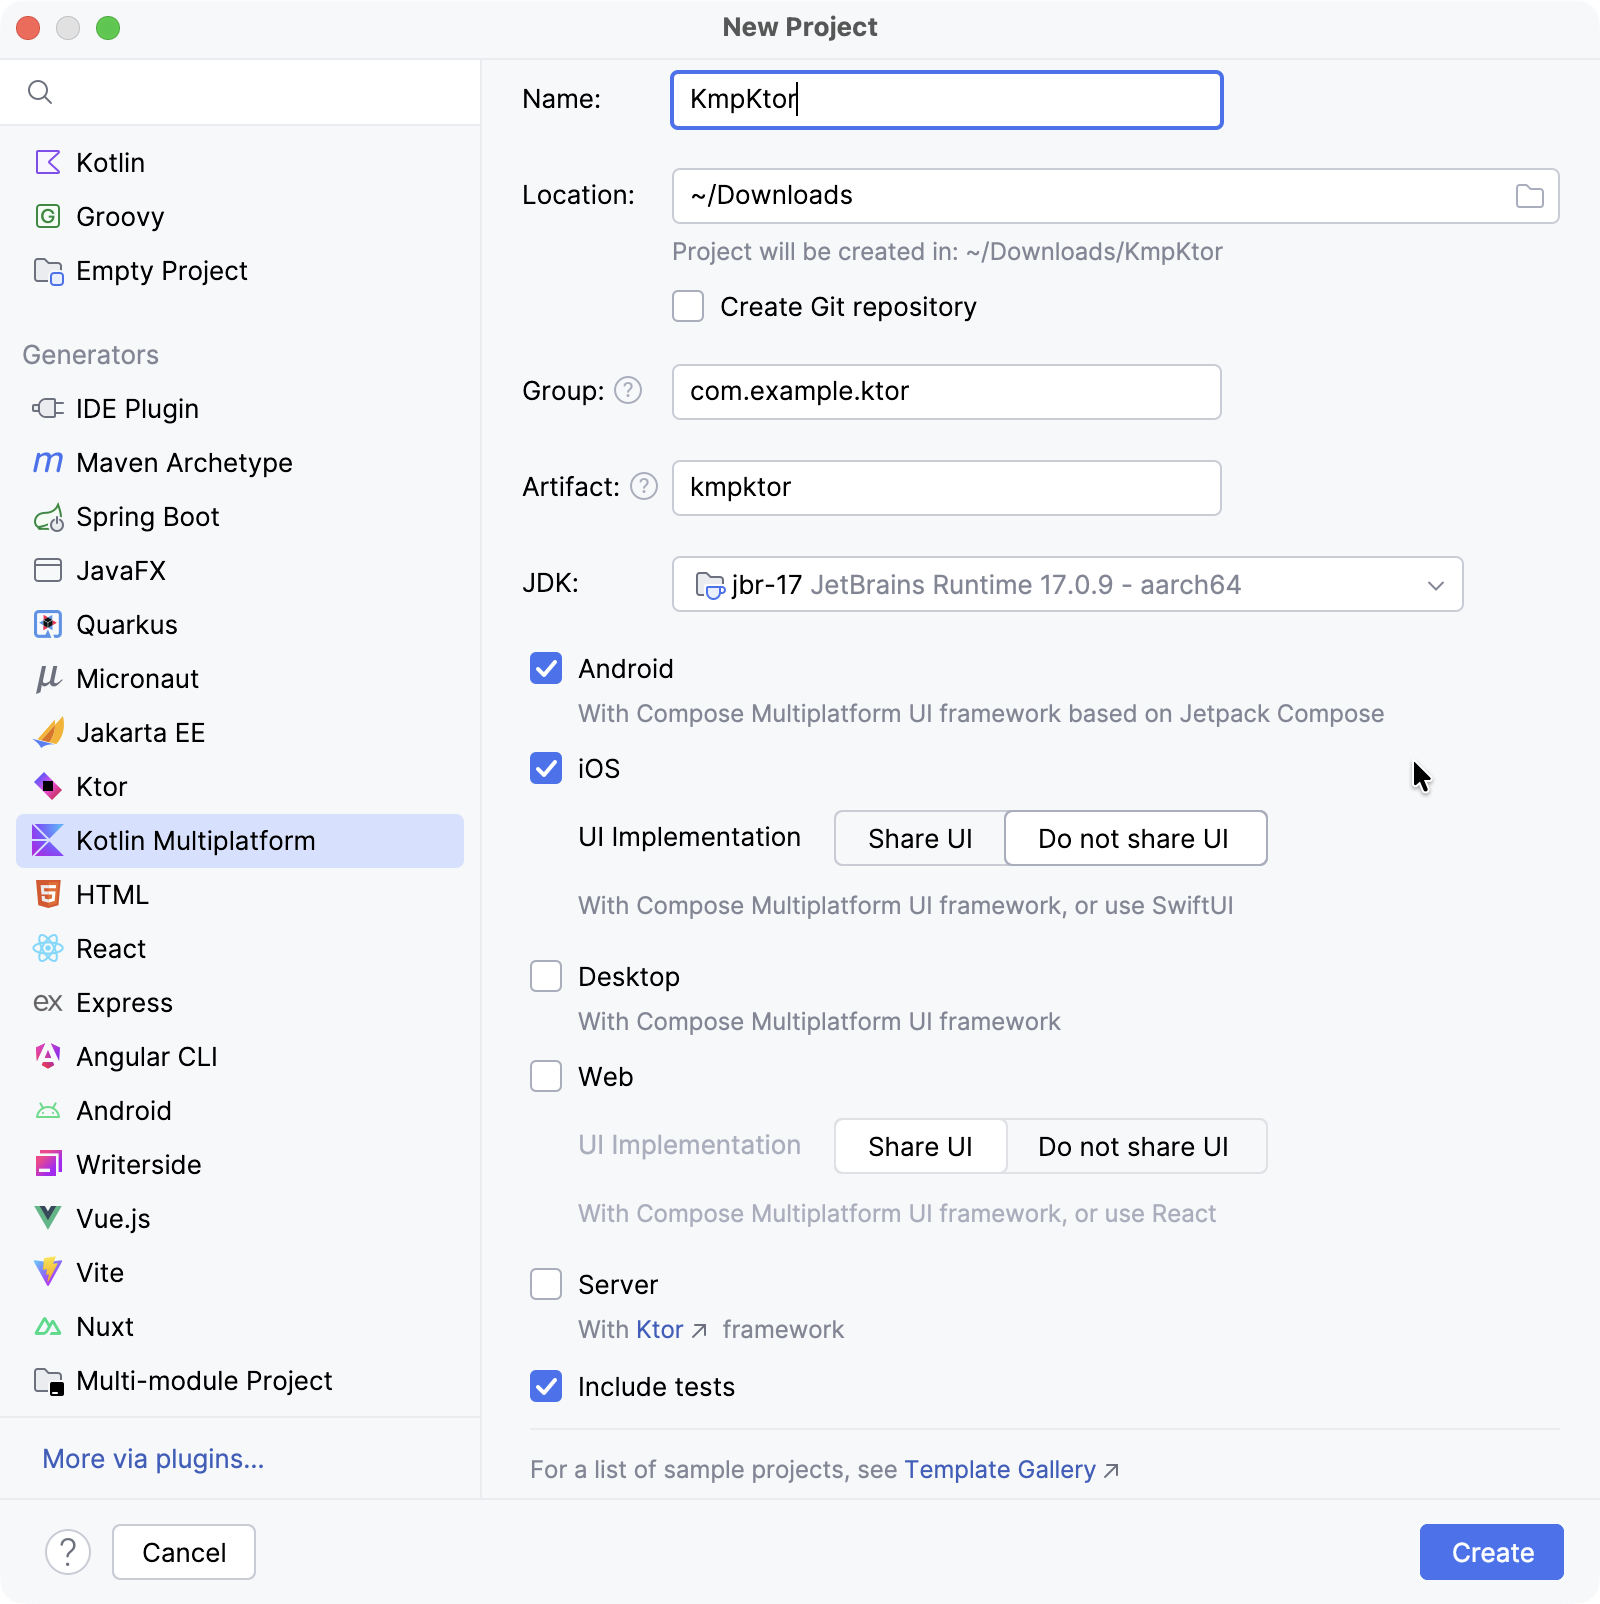
- 选择 Android 和 iOS 目标平台。
- 对于 iOS,选择 Do not share UI 选项以保持 UI 原生。
- 点击 Create 按钮,等待 IDE 生成并导入项目。
配置构建脚本
添加 Ktor 依赖项
要在你的项目中使用 Ktor HTTP 客户端,你需要添加至少两个依赖项:客户端依赖项和 引擎 依赖项。
打开
gradle/libs.versions.toml文件并添加 Ktor 版本:
kotlin[versions] ktor = "3.3.2"在相同的
gradle/libs.versions.toml文件中定义 Ktor 客户端和引擎库:
kotlin[libraries] ktor-client-core = { module = "io.ktor:ktor-client-core", version.ref = "ktor" } ktor-client-okhttp = { module = "io.ktor:ktor-client-okhttp", version.ref = "ktor" } ktor-client-darwin = { module = "io.ktor:ktor-client-darwin", version.ref = "ktor" }打开
shared/build.gradle.kts文件并添加以下依赖项:
kotlinsourceSets { commonMain.dependencies { implementation(libs.ktor.client.core) } androidMain.dependencies { implementation(libs.ktor.client.okhttp) } iosMain.dependencies { implementation(libs.ktor.client.darwin) } }- 将
ktor-client-core添加到commonMain源代码集,以在共享代码中启用 Ktor 客户端功能。 - 在
androidMain源代码集中,包含ktor-client-okhttp依赖项以在 Android 上使用OkHttp引擎。或者,你可以从 其他可用的 Android/JVM 引擎 中选择。 - 在
iosMain源代码集中,添加ktor-client-darwin依赖项以在 iOS 上使用 Darwin 引擎。
- 将
添加协程
要在 Android 代码 中使用协程,你需要将 kotlinx.coroutines 添加到你的项目:
打开
gradle/libs.versions.toml文件并指定协程版本和库:
kotlin[versions] kotlinx-coroutines = "1.10.2" [libraries] kotlinx-coroutines-core = { module = "org.jetbrains.kotlinx:kotlinx-coroutines-core", version.ref = "kotlinx-coroutines" } kotlinx-coroutines-android = { module = "org.jetbrains.kotlinx:kotlinx-coroutines-android", version.ref = "kotlinx-coroutines" }打开
shared/build.gradle.kts文件并将
kotlinx-coroutines-core依赖项添加到commonMain源代码集:kotlinsourceSets { commonMain.dependencies { implementation(libs.ktor.client.core) implementation(libs.kotlinx.coroutines.core) } }然后,打开
composeApp/build.gradle.kts文件并将
kotlinx-coroutines-android依赖项添加到androidMain源代码集:kotlinsourceSets { androidMain.dependencies { // ... implementation(libs.kotlinx.coroutines.android) } }选择 Build | Sync Project with Gradle Files 以安装添加的依赖项。
更新你的应用程序
共享代码
要更新 Android 和 iOS 之间共享的代码,请打开
shared/src/commonMain/kotlin/com/example/ktor/kmpktor/Greeting.kt文件并将以下代码添加到 Greeting 类:
package com.example.ktor.kmpktor

import io.ktor.client.HttpClient
import io.ktor.client.request.get
import io.ktor.client.statement.bodyAsText

class Greeting {
    private val client = HttpClient()

    suspend fun greet(): String {
        val response = client.get("https://ktor.io/docs/")
        return response.bodyAsText()
    }
}Android 代码
打开
composeApp/src/androidMain/kotlin/com/example/ktor/kmpktor/App.kt文件并按如下方式更新代码:
package com.example.ktor.kmpktor

import androidx.compose.foundation.background
import androidx.compose.foundation.layout.Column
import androidx.compose.foundation.layout.fillMaxSize
import androidx.compose.foundation.layout.safeContentPadding
import androidx.compose.material3.MaterialTheme
import androidx.compose.material3.Text
import androidx.compose.runtime.*
import androidx.compose.ui.Alignment
import androidx.compose.ui.Modifier
import org.jetbrains.compose.ui.tooling.preview.Preview

@Composable
@Preview
fun App() {
    MaterialTheme {
        Column(
            modifier = Modifier
                .background(MaterialTheme.colorScheme.primaryContainer)
                .safeContentPadding()
                .fillMaxSize(),
            horizontalAlignment = Alignment.CenterHorizontally,
        ) {
            var text by remember { mutableStateOf("Loading") }
            LaunchedEffect(true) {
                text = try {
                    Greeting().greet()
                } catch (e: Exception) {
                    e.message ?: "error"
                }
            }
            GreetingView(text)
        }
    }
}

@Composable
fun GreetingView(text: String) {
    Text(text = text)
}

@Preview
@Composable
fun DefaultPreview() {
    MaterialTheme {
        GreetingView("Hello, Android!")
    }
}
LaunchedEffect() 启动一个与可组合项生命周期绑定的协程。在此协程中,将调用共享的 greet() 函数,其结果赋值给 text,并捕获和处理任何异常。
iOS 代码
打开
iosApp/iosApp/ContentView.swift文件并按如下方式更新代码:
import SwiftUI
import Shared

struct ContentView: View {
    @StateObject private var viewModel = ViewModel()

    var body: some View {
        Text(viewModel.text)
    }
}

extension ContentView {
    @MainActor
    class ViewModel: ObservableObject {
        @Published var text = "Loading..."
        init() {
            Greeting().greet { greeting, error in
                if let greeting = greeting {
                    self.text = greeting
                } else {
                    self.text = error?.localizedDescription ?? "error"
                }
            }
        }
    }
}
在 iOS 上,greet() 挂起函数可作为带回调的函数使用。
在 Android 上启用互联网访问
我们需要做的最后一件事是为 Android 应用程序启用互联网访问。 打开
composeApp/src/androidMain/AndroidManifest.xml文件并使用 <uses-permission> 元素启用所需权限:
<manifest>
    <uses-permission android:name="android.permission.INTERNET" />
    <application>
        ...
    </application>
</manifest>
在 Android 上运行你的应用程序
在 IntelliJ IDEA 中,在运行配置列表中选择 composeApp。
在配置列表旁边选择一个 Android 虚拟设备,然后点击 Run。

如果列表中没有设备,请创建 新的 Android 虚拟设备。
加载后,模拟器应将接收到的 HTML 文档显示为纯文本。

如果你的 Android 模拟器无法连接到互联网,请尝试执行冷启动。 在 Device Manager 工具窗口中,点击已停止设备旁边的 ⋮ (三个点),然后从菜单中选择 Cold Boot。这通常有助于清除可能导致连接问题的损坏模拟器缓存。
在 iOS 上运行你的应用程序
在 IntelliJ IDEA 中,在运行配置列表中选择 iosApp。
在配置列表旁边选择一个 iOS 模拟设备,然后点击 Run。

如果列表中没有可用的 iOS 配置,请添加 新的运行配置。
加载后,模拟器应将接收到的 HTML 文档显示为纯文本。
