建立跨平台行動應用程式
程式碼範例: tutorial-client-kmp
Ktor HTTP 客戶端可用於多平台專案。在本教學中,我們將建立一個簡單的 Kotlin Multiplatform Mobile 應用程式,它會發送請求並以純 HTML 文字形式接收響應主體。
前置條件
首先,您需要透過在合適的作業系統上安裝必要工具,來設定跨平台行動開發環境。請參閱 設定環境 部分,了解如何執行此操作。
您將需要一台搭載 macOS 的 Mac 以完成本教學中的某些步驟,其中包括編寫 iOS 特有程式碼和執行 iOS 應用程式。
建立新專案
若要建立新專案,您可以使用 IntelliJ IDEA 中的 Kotlin Multiplatform 專案精靈。它將建立一個基本的多平台專案,您可以透過客戶端和服務來擴展它。
- 啟動 IntelliJ IDEA。
- 在 IntelliJ IDEA 中,選擇 File | New | Project。
- 在左側面板中,選擇 Kotlin Multiplatform。
- 在 New Project 視窗中指定以下欄位:
- 名稱:KmpKtor
- 群組:com.example.ktor
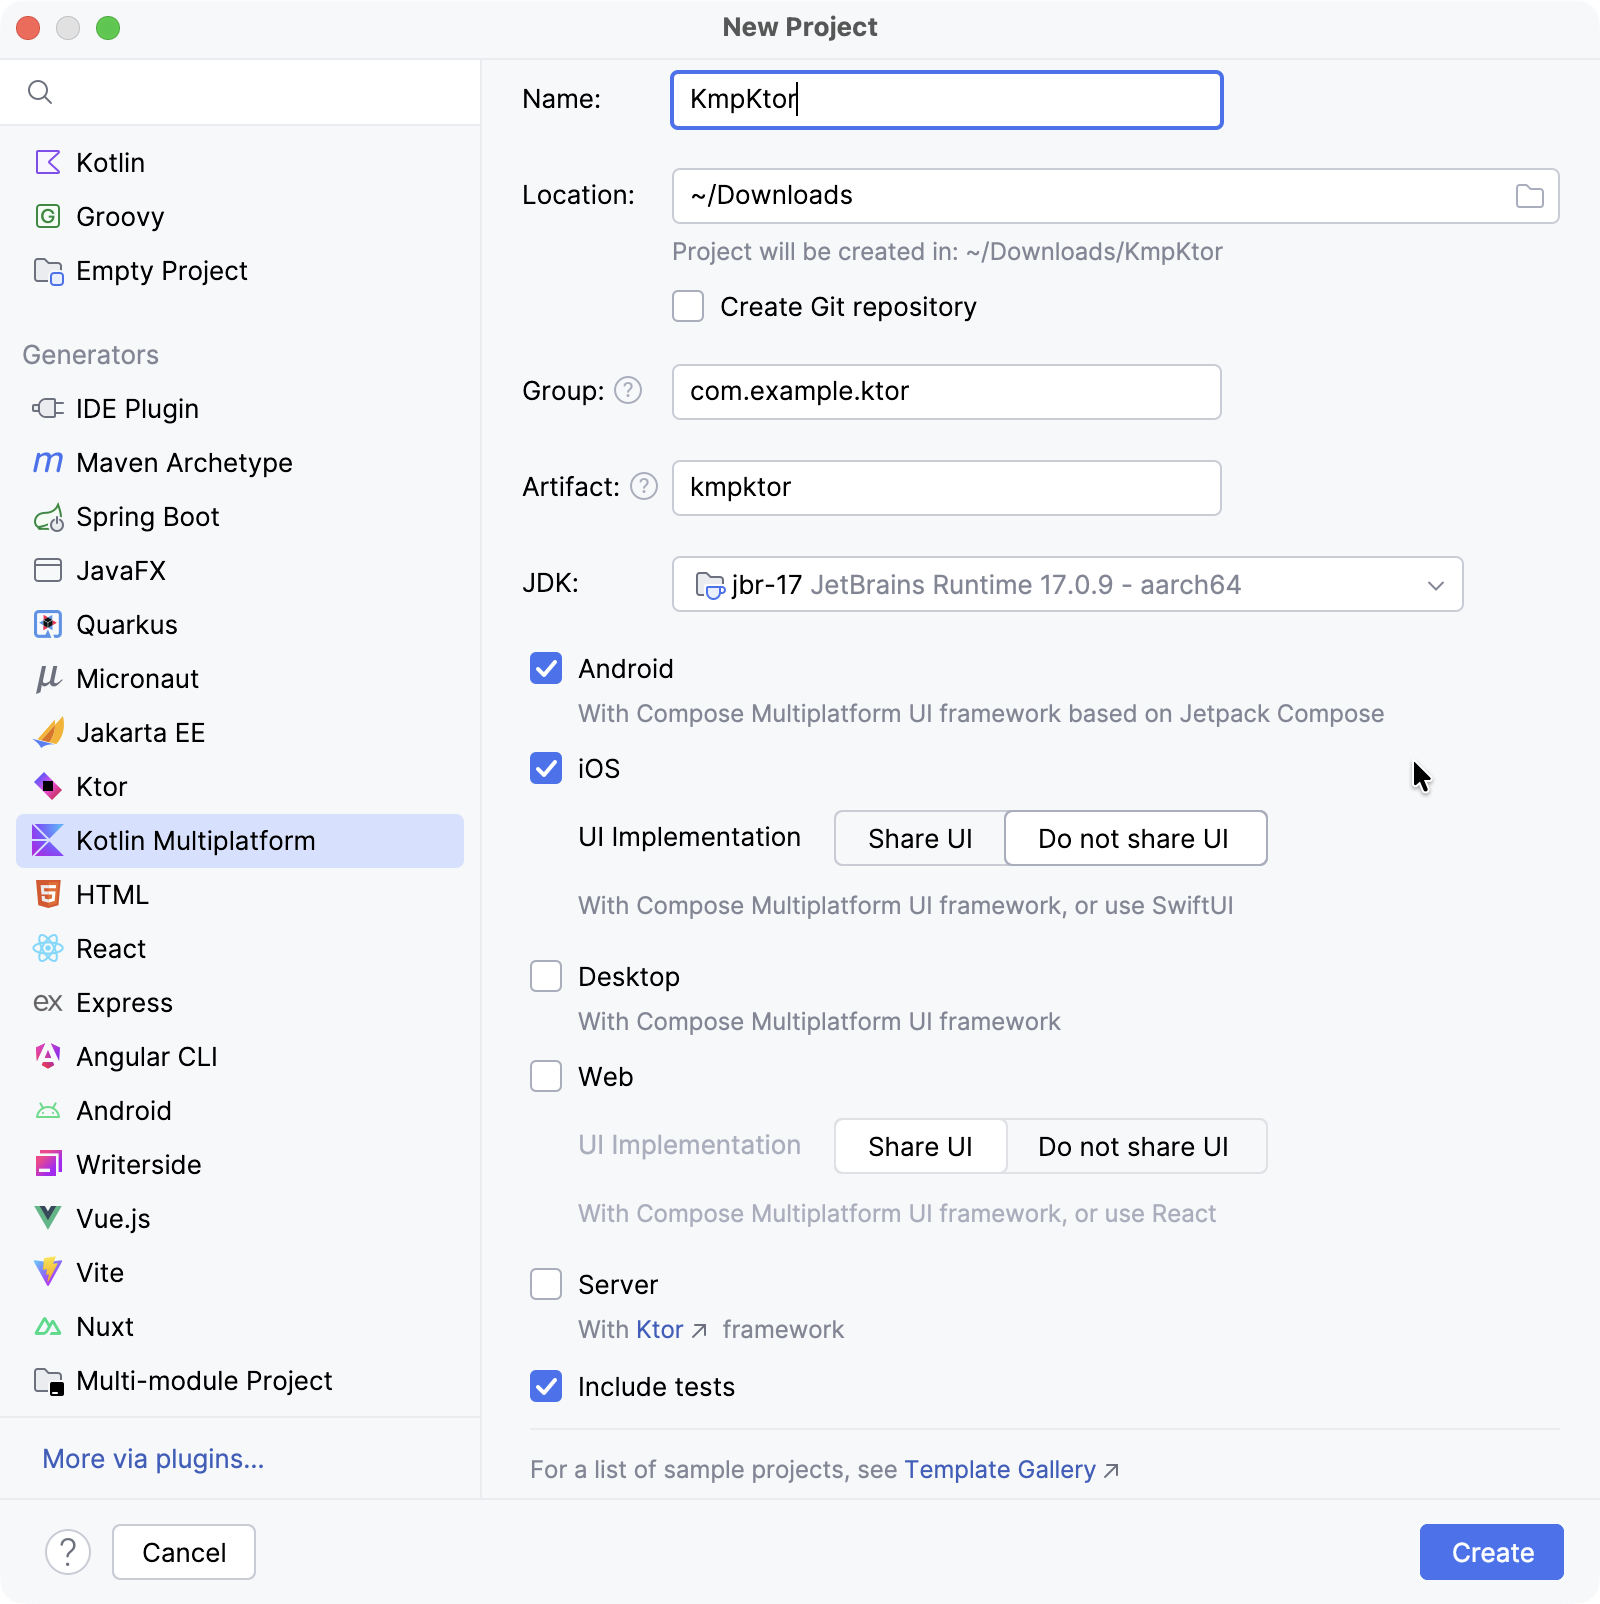
- 選擇 Android 和 iOS 目標。
- 對於 iOS,選擇 Do not share UI 選項以保持 UI 原生。
- 點擊 Create 按鈕,然後等待 IDE 產生並匯入專案。
配置建構指令碼
新增 Ktor 依賴項
若要在您的專案中使用 Ktor HTTP 客戶端,您至少需要新增兩個依賴項:一個客戶端依賴項和一個 引擎 依賴項。
開啟
gradle/libs.versions.toml檔案並新增 Ktor 版本:
kotlin[versions] ktor = "3.3.2"在相同的
gradle/libs.versions.toml檔案中,定義 Ktor 客戶端和引擎函式庫:
kotlin[libraries] ktor-client-core = { module = "io.ktor:ktor-client-core", version.ref = "ktor" } ktor-client-okhttp = { module = "io.ktor:ktor-client-okhttp", version.ref = "ktor" } ktor-client-darwin = { module = "io.ktor:ktor-client-darwin", version.ref = "ktor" }開啟
shared/build.gradle.kts檔案並新增以下依賴項:
kotlinsourceSets { commonMain.dependencies { implementation(libs.ktor.client.core) } androidMain.dependencies { implementation(libs.ktor.client.okhttp) } iosMain.dependencies { implementation(libs.ktor.client.darwin) } }- 將
ktor-client-core新增到commonMain源集,以在共享程式碼中啟用 Ktor 客戶端功能。 - 在
androidMain源集中,包含ktor-client-okhttp依賴項以在 Android 上使用OkHttp引擎。另外,您可以從 其他可用的 Android/JVM 引擎 中選擇。 - 在
iosMain源集中,新增ktor-client-darwin依賴項以在 iOS 上使用 Darwin 引擎。
- 將
新增協程
若要在 Android 程式碼 中使用協程,您需要將 kotlinx.coroutines 新增到您的專案:
開啟
gradle/libs.versions.toml檔案並指定協程版本和函式庫:
kotlin[versions] kotlinx-coroutines = "1.10.2" [libraries] kotlinx-coroutines-core = { module = "org.jetbrains.kotlinx:kotlinx-coroutines-core", version.ref = "kotlinx-coroutines" } kotlinx-coroutines-android = { module = "org.jetbrains.kotlinx:kotlinx-coroutines-android", version.ref = "kotlinx-coroutines" }開啟
shared/build.gradle.kts檔案並將
kotlinx-coroutines-core依賴項新增到commonMain源集:kotlinsourceSets { commonMain.dependencies { implementation(libs.ktor.client.core) implementation(libs.kotlinx.coroutines.core) } }然後,開啟
composeApp/build.gradle.kts檔案並將
kotlinx-coroutines-android依賴項新增到androidMain源集:kotlinsourceSets { androidMain.dependencies { // ... implementation(libs.kotlinx.coroutines.android) } }選擇 Build | Sync Project with Gradle Files 以安裝新增的依賴項。
更新您的應用程式
共享程式碼
若要更新 Android 和 iOS 之間共享的程式碼,請開啟
shared/src/commonMain/kotlin/com/example/ktor/kmpktor/Greeting.kt檔案並將以下程式碼新增到 Greeting 類別中:
package com.example.ktor.kmpktor

import io.ktor.client.HttpClient
import io.ktor.client.request.get
import io.ktor.client.statement.bodyAsText

class Greeting {
    private val client = HttpClient()

    suspend fun greet(): String {
        val response = client.get("https://ktor.io/docs/")
        return response.bodyAsText()
    }
}Android 程式碼
開啟
composeApp/src/androidMain/kotlin/com/example/ktor/kmpktor/App.kt檔案並按如下方式更新程式碼:
package com.example.ktor.kmpktor

import androidx.compose.foundation.background
import androidx.compose.foundation.layout.Column
import androidx.compose.foundation.layout.fillMaxSize
import androidx.compose.foundation.layout.safeContentPadding
import androidx.compose.material3.MaterialTheme
import androidx.compose.material3.Text
import androidx.compose.runtime.*
import androidx.compose.ui.Alignment
import androidx.compose.ui.Modifier
import org.jetbrains.compose.ui.tooling.preview.Preview

@Composable
@Preview
fun App() {
    MaterialTheme {
        Column(
            modifier = Modifier
                .background(MaterialTheme.colorScheme.primaryContainer)
                .safeContentPadding()
                .fillMaxSize(),
            horizontalAlignment = Alignment.CenterHorizontally,
        ) {
            var text by remember { mutableStateOf("Loading") }
            LaunchedEffect(true) {
                text = try {
                    Greeting().greet()
                } catch (e: Exception) {
                    e.message ?: "error"
                }
            }
            GreetingView(text)
        }
    }
}

@Composable
fun GreetingView(text: String) {
    Text(text = text)
}

@Preview
@Composable
fun DefaultPreview() {
    MaterialTheme {
        GreetingView("Hello, Android!")
    }
}
LaunchedEffect() 啟動一個與可組合項生命週期相關聯的協程。在這個協程中,呼叫共享的 greet() 函式,其結果被指派給 text,並且捕獲並處理任何異常。
iOS 程式碼
開啟
iosApp/iosApp/ContentView.swift檔案並按如下方式更新程式碼:
import SwiftUI
import Shared

struct ContentView: View {
    @StateObject private var viewModel = ViewModel()

    var body: some View {
        Text(viewModel.text)
    }
}

extension ContentView {
    @MainActor
    class ViewModel: ObservableObject {
        @Published var text = "Loading..."
        init() {
            Greeting().greet { greeting, error in
                if let greeting = greeting {
                    self.text = greeting
                } else {
                    self.text = error?.localizedDescription ?? "error"
                }
            }
        }
    }
}
在 iOS 上,掛起函式 greet() 可作為帶有回呼函式的函式使用。
在 Android 上啟用網路存取
最後一步是為 Android 應用程式啟用網路存取。 開啟
composeApp/src/androidMain/AndroidManifest.xml檔案並使用 <uses-permission> 元素啟用所需的權限:
<manifest>
    <uses-permission android:name="android.permission.INTERNET" />
    <application>
        ...
    </application>
</manifest>
在 Android 上執行您的應用程式
在 IntelliJ IDEA 中,從執行配置清單中選擇 composeApp。
在配置清單旁邊選擇一個 Android 虛擬裝置,然後點擊 Run。

如果清單中沒有裝置,請建立一個 新的 Android 虛擬裝置。
載入後,模擬器應將接收到的 HTML 文件顯示為純文字。

如果您的 Android 模擬器無法連線到網際網路,請嘗試執行冷啟動。 在 Device Manager 工具視窗中,點擊停止裝置旁邊的 ⋮ (三個點),然後從選單中選擇 Cold Boot。這通常有助於清除可能導致連線問題的損壞模擬器快取。
在 iOS 上執行您的應用程式
在 IntelliJ IDEA 中,從執行配置清單中選擇 iosApp。
在配置清單旁邊選擇一個 iOS 模擬裝置,然後點擊 Run。

如果清單中沒有可用的 iOS 配置,請 新增執行配置。
載入後,模擬器應將接收到的 HTML 文件顯示為純文字。
